
|
|
 |
|
|
|
Welcome to the Australian Ford Forums forum. You are currently viewing our boards as a guest which gives you limited access to view most discussions and inserts advertising. By joining our free community you will have access to post topics, communicate privately with other members, respond to polls, upload content and access many other special features without post based advertising banners. Registration is simple and absolutely free so please, join our community today! If you have any problems with the registration process or your account login, please contact us. Please Note: All new registrations go through a manual approval queue to keep spammers out. This is checked twice each day so there will be a delay before your registration is activated. |
|
|||||||
 |
|
|
Thread Tools | Display Modes |
|
|
#1 | ||
|
Starter Motor
Join Date: Nov 2011
Posts: 9
|
Hi all, I just picked up a 99 AU wagon with 233k on it. Got it off a friend who has had it for 5 years and had it regularly serviced. Drives well, had a little rust we cut out. Not bad for $300!!
Its got a few minor faults, and suggestions on how to fix would be greatly appreciated. The indicator(blinker) will not cancel when turning left or right. I was told by a Ford wrecker that the steering wheel could be out 180deg and that is causing the problem, something to do with the clock spring. Any other suggestions? The AC works well but the heater does not work? There is a clunk in the front right suspension. Noticeable when hard braking. I replaced the sway bar bushed but made no difference. Any ideas? |
||
|
|

|
|
|
#2 | ||
|
Next upgraded Mk1 Leopard
 Join Date: Jan 2005
Location: Sydney, in the burbs
Posts: 4,913
|
Welcome Ivo to the forums. Very cheap indeed. Can't help with the three items listed but I am sure that someone will have some ideas for you.
UK
__________________
Plastic Surgery 1 AUII Monsoon Blue How 2's: Change rear view mirror, Install backfire valve, Change foam front seats, Install auto transmission cooler, Replace Trans Shift Globe, Remove front door Trim, Paint AU headlights, install door spears, Premium Rear Parcel Shelf, go here...
 |
||
|
|

|
|
|
#3 | ||
|
FF.Com.Au Hardcore
Join Date: Feb 2005
Location: Melb north
Posts: 12,025
|
not sure about the other 2 but for the heater, i would check the heater tap is operating, , it is vacuum operated and located under the inlet manifold area(bit of a pain ), perhaps you could get someone to operate the temperature from hot to cold (with the motor running)and watch the tap to see it is operating, i`m thinking if it is not it may be the control on the dash or a vacuum problem(someone might be able to expand on this), and welcome to the forums.
|
||
|
|

|
|
|
#4 | ||
|
meh.
 Join Date: Jul 2010
Location: Was Central Coast, Now Sydney NSW
Posts: 8,584
|
Welcome to AFF!...
Indicator issue will probably just be the relay.... I can't remember if it's in the interior fuse panel or the underbonnet one next to the battery...
__________________
Previous - BF XR6T - 325rwkw, 6 Speed Auto, Process West, X-Force and Turbosmart gear |
||
|
|

|
|
|
#5 | ||
|
Regular Member
Join Date: Oct 2008
Location: Burpengary, Q
Posts: 112
|
Errrr...I think the cancel function of the turn indicators is a mechanical function of the steering wheel, your informant may well have been right IMHO.
About the noise in the front end, you may simply have to get 'down and dirty' and checkout every component of the entire front suspension/brakes to pinpoint that 'clunk'. Cheers...4ford |
||
|
|

|
|
|
#6 | ||
|
rexnet
Join Date: Feb 2010
Location: Adelaide, South Australia
Posts: 3,562
|
2002au knows about clock springs. it means the steering wheel has been mega turned when the steering racks been taken out.
|
||
|
|

|
|
|
#7 | ||
|
Starter Motor
Join Date: Nov 2011
Posts: 9
|
Thanks for the replies fellas!
Heater seemed to be working today.....not hot but definitely warm. Not a major concern but will check out the heater tap. Indicator is the biggest concern. Turn on the blinker, turn the corner, straighten steering wheel, blinker stays on and stalk stay in up or down position and does not return to center (off) position. Steering rack was replaced about 2 years ago. Former owner can not remember when the blinker stop working but may have been around the time the rack was replaced. From what I have read, if the wheel gets turned too many times when not connected to the rack it can cause problems. Does sound right? If so how do I fix it? |
||
|
|

|
|
|
#8 | ||
|
Walking with God
Join Date: Mar 2005
Location: Melbourne
Posts: 7,321
|
Welcome.
I'd reckon the heater tap. Clunk could be a stuffed shock or loose suspension bolt, or loose brake caliper bolt or, or or! Clock spring is probably broken. There's a few around on ebay and the like. This will help you get the steering wheel off. Changing Steering Wheel http://www.fordforums.com.au/showpos...1&postcount=59 Let us know how you get on. GK
__________________
2009 Mondeo Zetec TDCi - Moondust Silver 2015 Kia Sorento Platinum - Snow White Pearl 2001 Ducati Monster 900Sie - Red Now gone! 1999 AU1 Futura Wagon - Sparkling Burgundy On LPG Want a Full Life? John 10:10 |
||
|
|

|
|
|
#9 | ||
|
Regular Member
Join Date: Jun 2010
Location: Sunshine Coast
Posts: 237
|
I found the most common heater problem with AU is stuffed thermostat.
|
||
|
|

|
|
|
#10 | ||
|
Starter Motor
Join Date: Nov 2011
Posts: 9
|
Mt temp guage sits very low. Where should it be?
|
||
|
|

|
|
|
#11 | ||
|
FF.Com.Au Hardcore
Join Date: Feb 2005
Location: Melb north
Posts: 12,025
|
probably around the n or o would be normal operating temperature i`d say(mine runs between the two), if the motor is running cold all the time, perhaps that is your heater problem, if that`s the case i would be checking to see if your motor has a thermostat in it, also checking the temperature on the thermostat,
someone may have put a cold one in, the factory thermostat is about 190/195 degrees, but you can buy them at spare parts down to 160 which is too cold unless your running the sahara desert 8 hours a day. |
||
|
|

|
|
|
#12 | |||
|
Walking with God
Join Date: Mar 2005
Location: Melbourne
Posts: 7,321
|
Quote:
Put a gas item in, sits between N and O. That didn't seem to affect the heater though. Still a good idea to check it, as it's simple and cheap enough to do. GK
__________________
2009 Mondeo Zetec TDCi - Moondust Silver 2015 Kia Sorento Platinum - Snow White Pearl 2001 Ducati Monster 900Sie - Red Now gone! 1999 AU1 Futura Wagon - Sparkling Burgundy On LPG Want a Full Life? John 10:10 |
|||
|
|

|
|
|
#13 | |||
|
FF.Com.Au Hardcore
Join Date: Jun 2008
Location: Perth, Western Australia
Posts: 2,009
|
Quote:
Itís a fairly easy fix. Youíll need a Torx T27 socket or allen key to remove the two bolts that hold the airbag on (ie the bolts are behind the steering wheel). I mistakenly used a T25, which worked if the bolts werenít on very tight. Rotate the steering wheel as you need to access each bolt head. You get easier access to the airbag bolts if you push the centre of the airbag into the steering wheel, but this will activate the horn. Disconnect the battery to stop that. The plastic on the bottom of the steering column is held on by three Philips head screws. The top plastic clips into the bottom one. The bolt holding the steering wheel on will require a Torx T50 socket. This is the same socket that is used on the seat mount bolts and the seatbelt mount bolts. The clockspring is mounted to the switchgear at two points. Have a look - the two little clips are easy to find, and will require a smallish flat blade screwdriver. Photo time. This photo shows the ute switchgear on the left, and the station wagon one on the right. The difference is the white plastic ring in the centre. It turns out that this is what controls the self-cancel, and that plastic ring was missing on my ute switchgear. 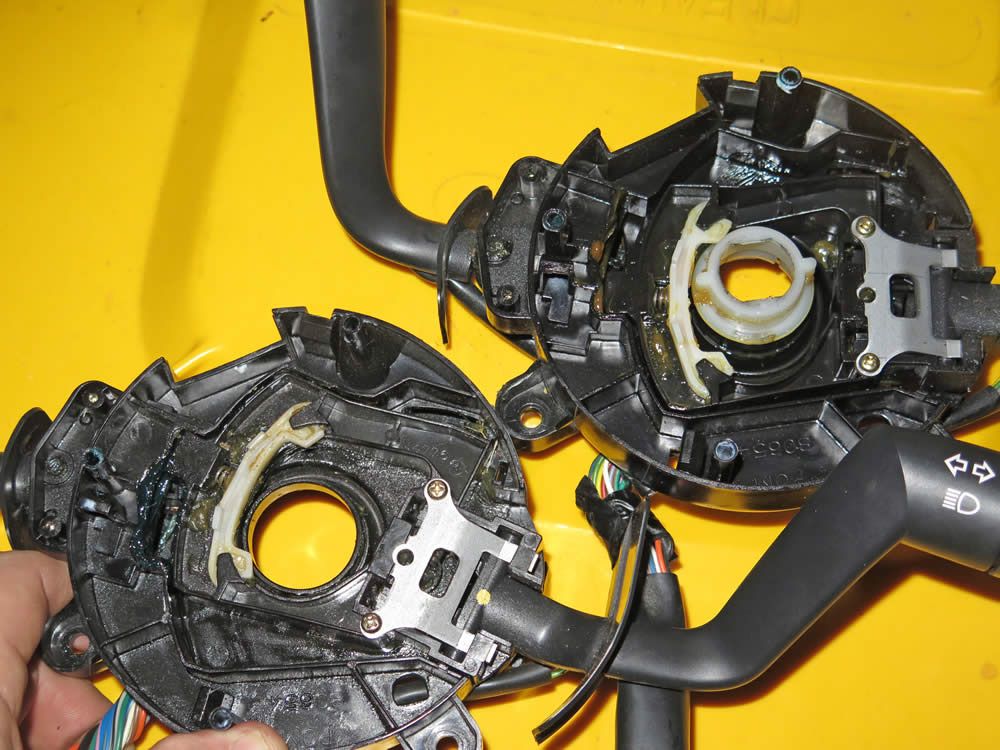 Hereís how it works - the white plastic ring rotates with the steering wheel and and steering column shaft. The switchgear stays stationary. You can see the two plastic tabs on the ring - one on each side. It is these tabs that control the self-cancel. Imagine that the car was turning to the left. If that centre ring rotates just a fraction more then it will push the plastic rod on the left, forcing the indicators to cancel. Itís actually very simple. 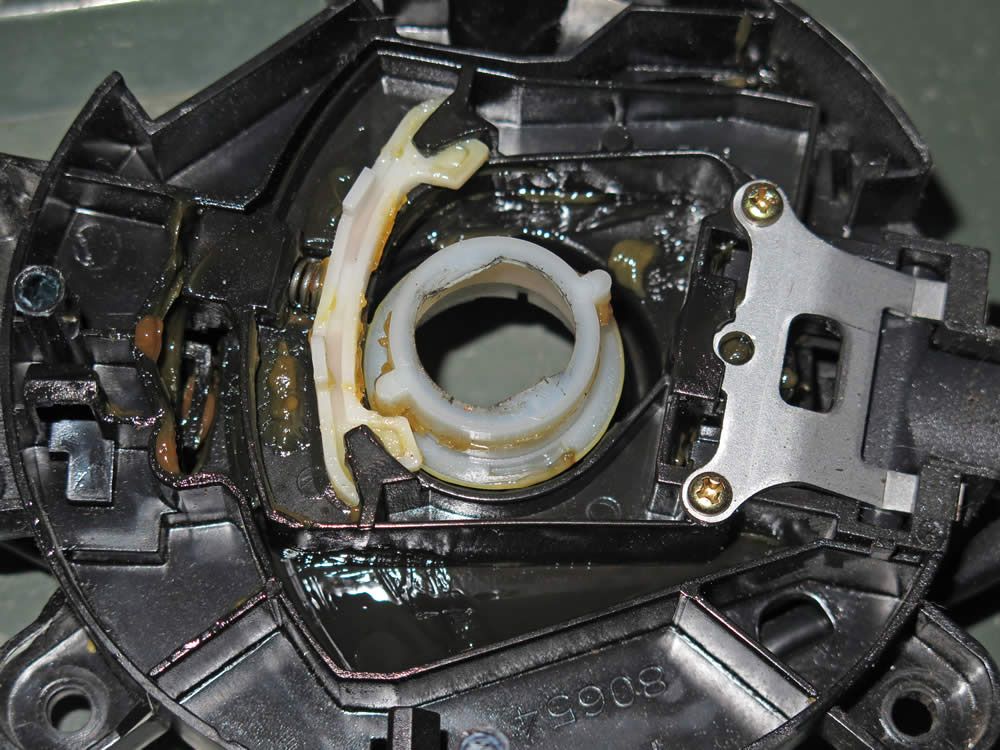 This time I have lined up a tab so that it is about to self-cancel when turning right (ie rotating the steering wheel clockwise). The plastic rod gets pushed, which builds up tension in the spring (thereís a ball bearing ball on the end), which forces the indicator stick to go back to its central position. 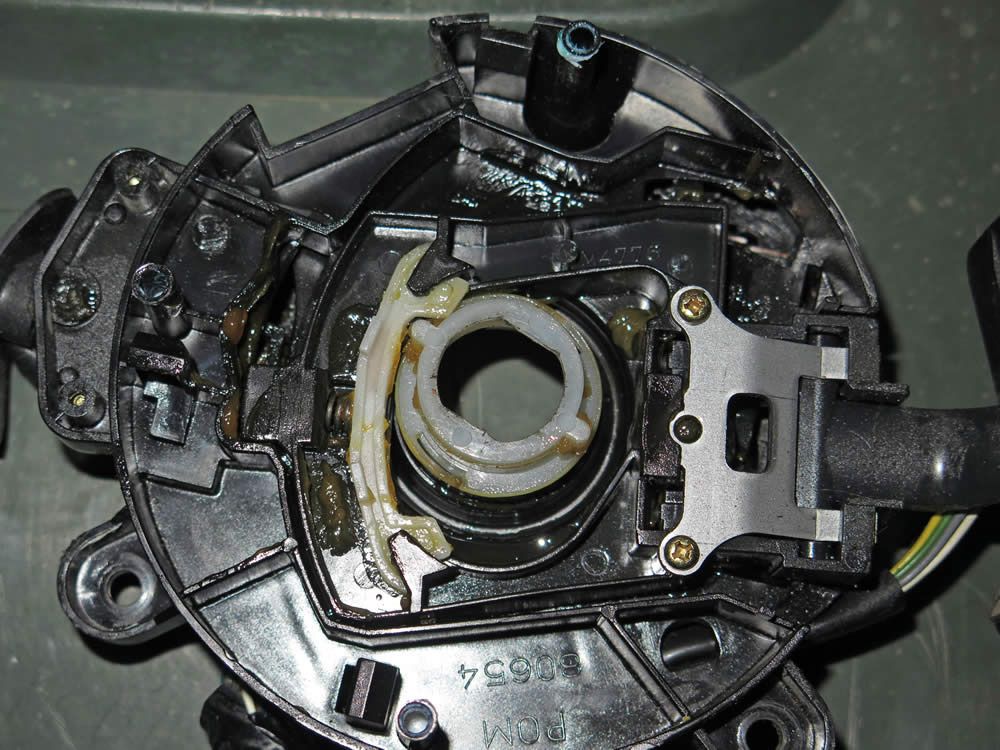 In this photo, if the centre ring continues to rotate clockwise (ie turning right) then it doesnít push the plastic rod far enough over to force the indicators to self-cancel. It had taken me some time to figure all this out, but now I know how to fix any future self-cancel problems that I might have with my taxis in the future. Itís all about that plastic ring in the centre. 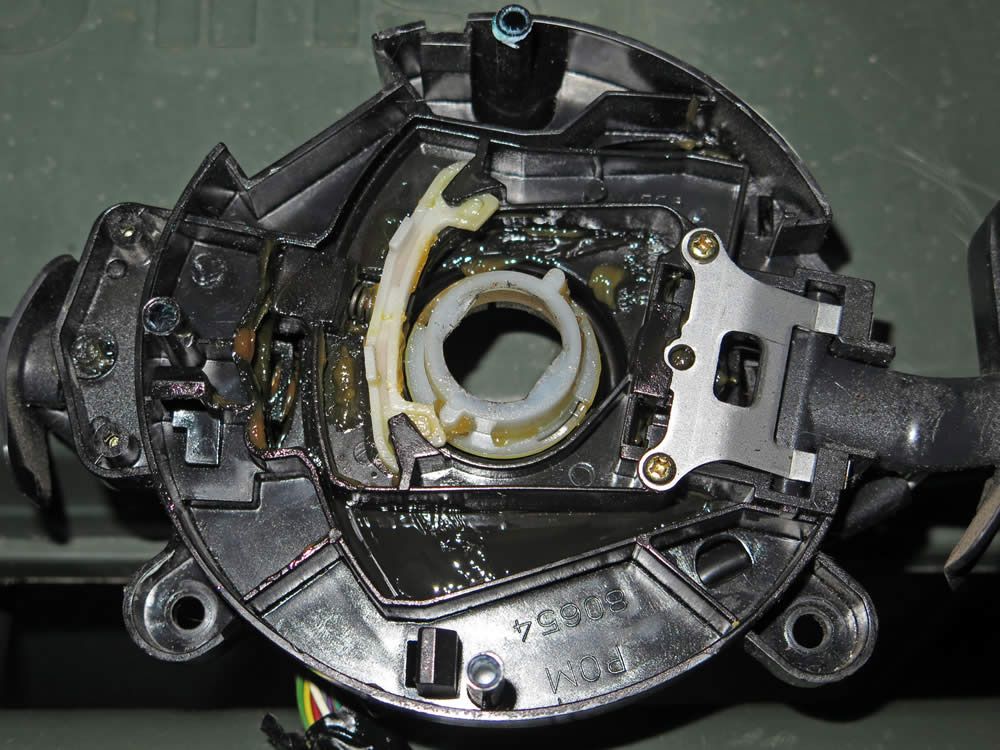 By now I had pulled everything apart and re-assembled it all several times. I learned that the clockspring didnít have to be disconnected and completely removed each time, so just left it hanging there. 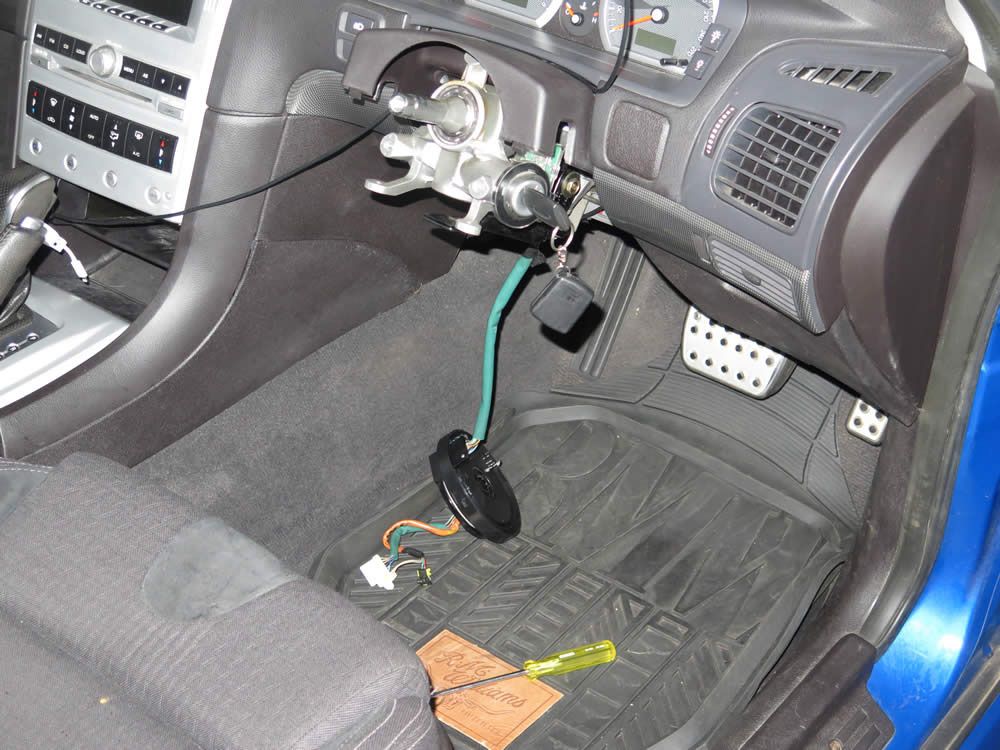 I removed the plastic ring from the station wagon switchgear. 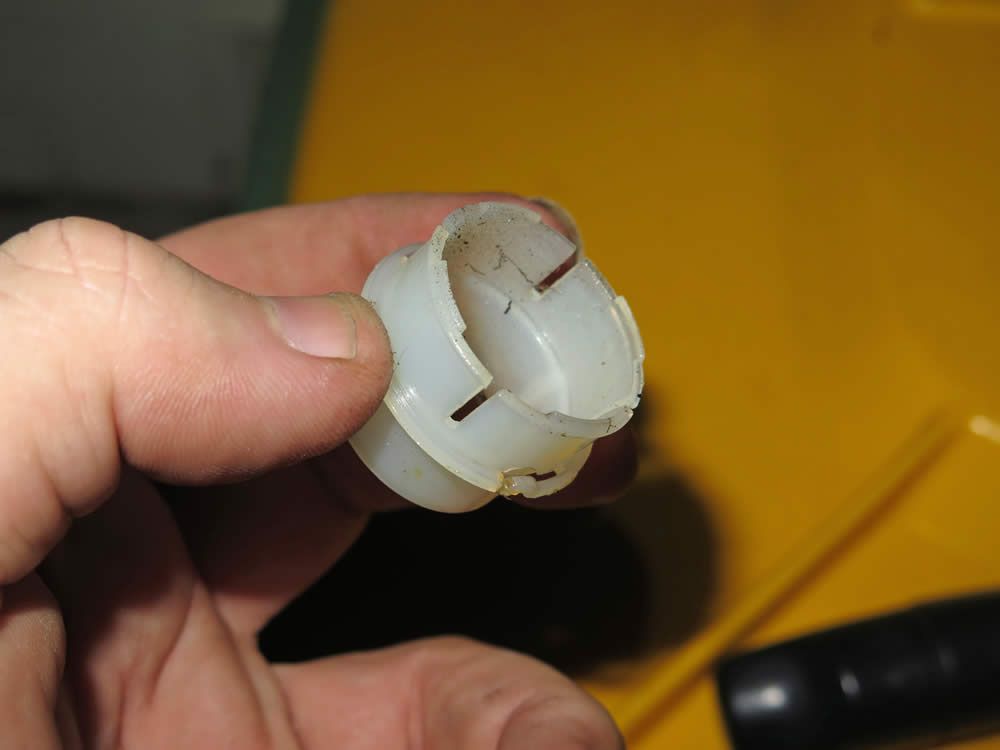 As the plastic ring will be regularly rotating within the switchgear, I added some grease. 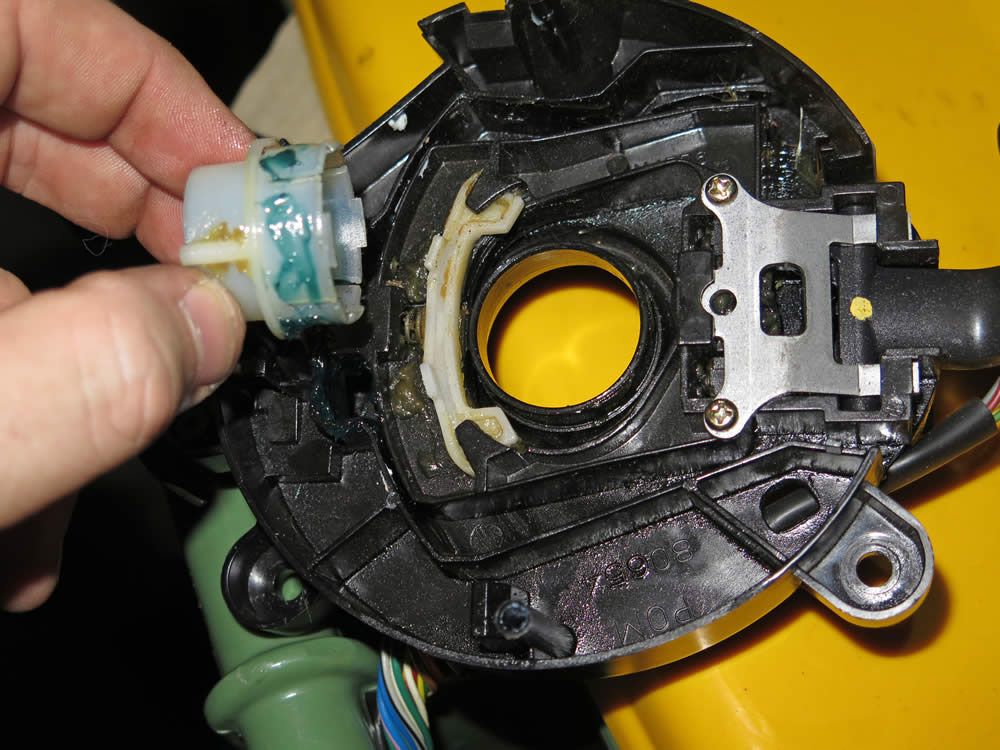 I pushed the plastic ring into place and made sure that there was also plenty of grease where the ball bearing is (on the end of the spring). 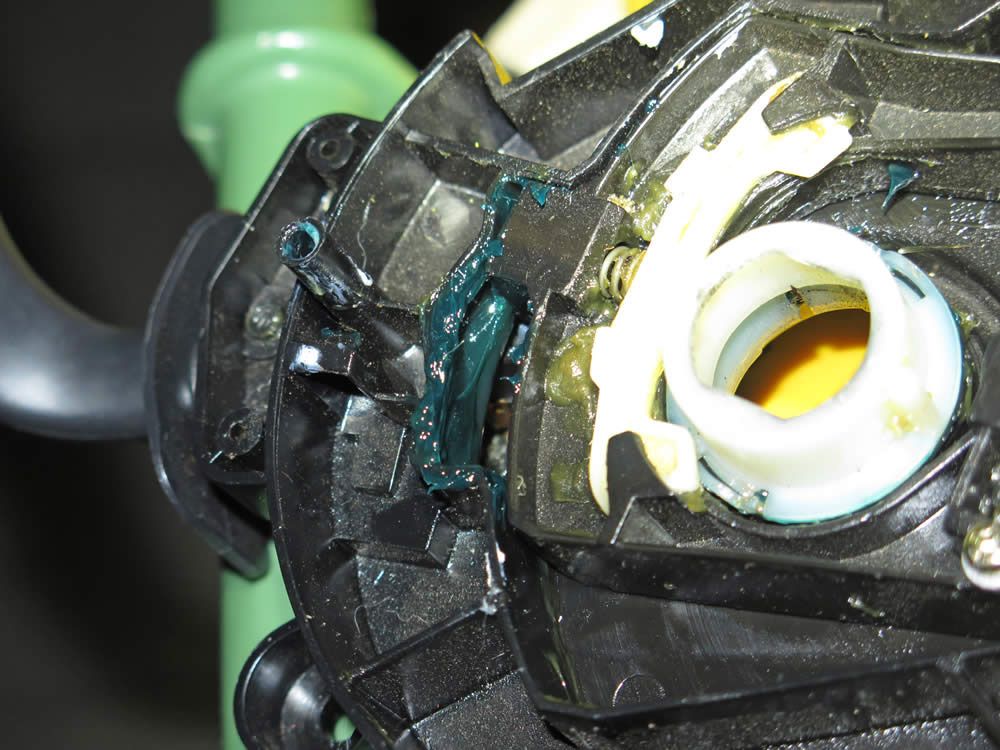 Doing all of this with wheelie bins made it easier. Putting the cable between the handle and bin meant that the switchgear couldnít slide off and onto the ground. 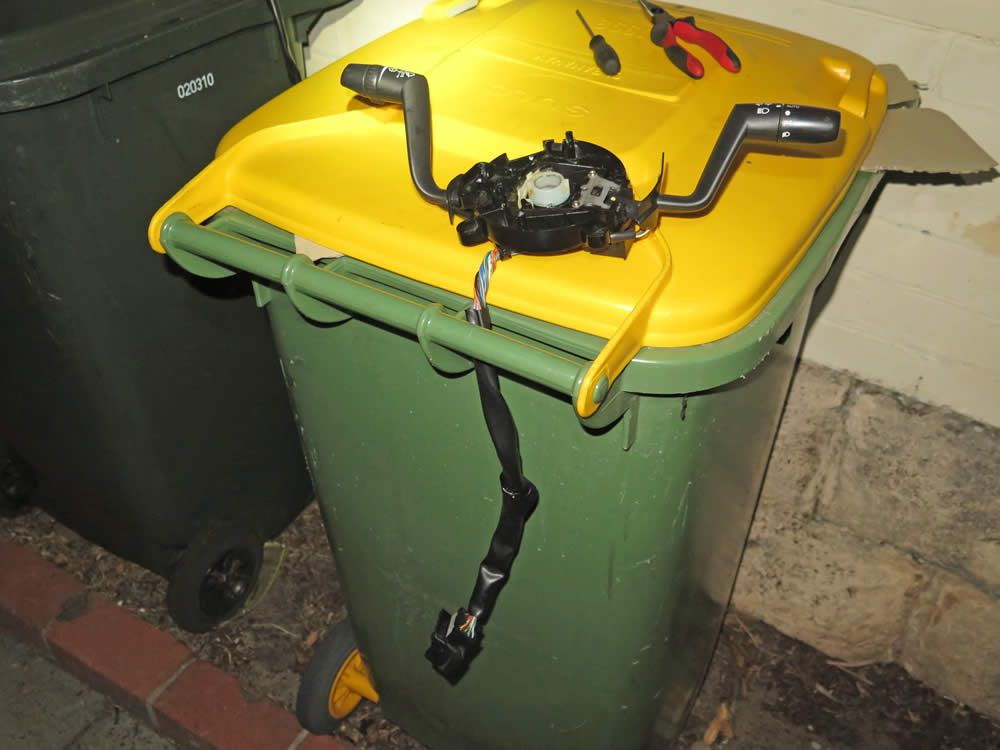 You can see here how the steering column shaft rotates the white plastic ring when the steering wheel is turned. The black plastic of the switchgear remains in the same place. 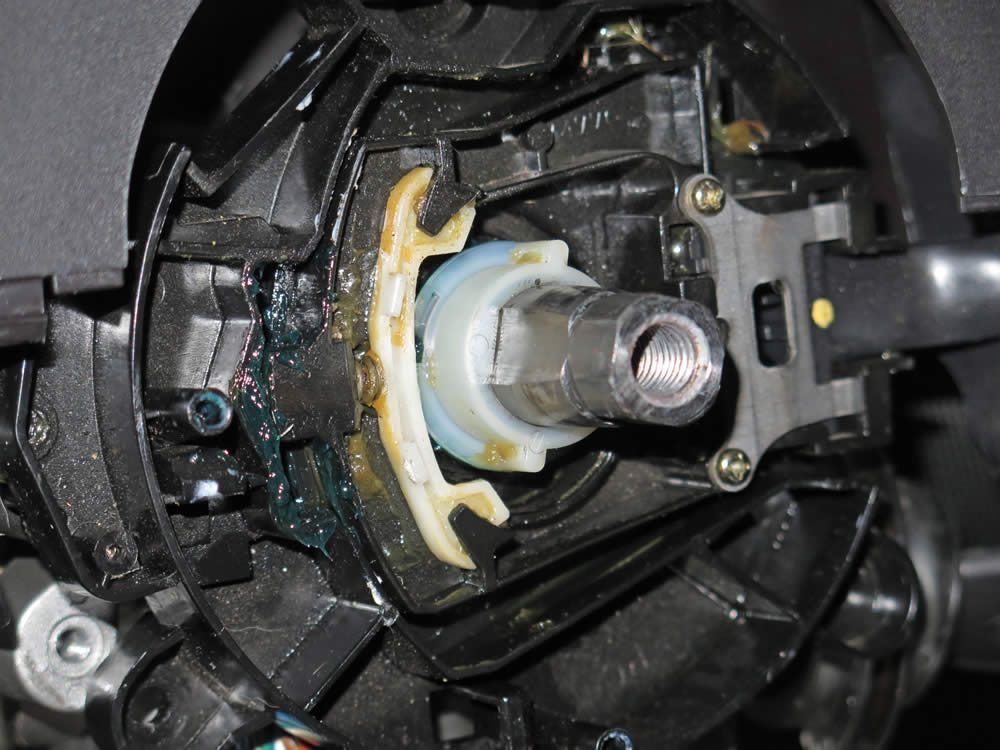 The switchgear is attached to the top of the steering column at three mounting points. One of them is at the end of the screwdriver. There is another screw on the left side and one on the top. A ratchet screwdriver made it easier to undo and tighten the screws, and a magnet made it easy to remove them without them dropping onto the floor and bouncing into some corner where they couldnít be found. 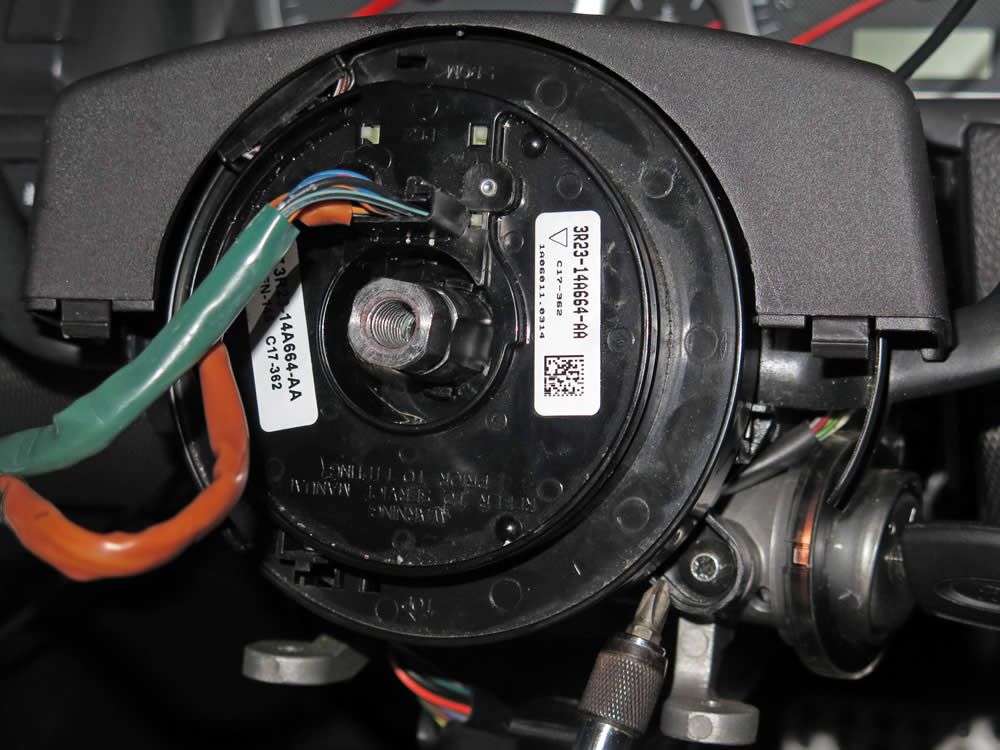 Finally getting somewhere. The switchgear and clockspring are in place, and the next step is to put the steering wheel back on. 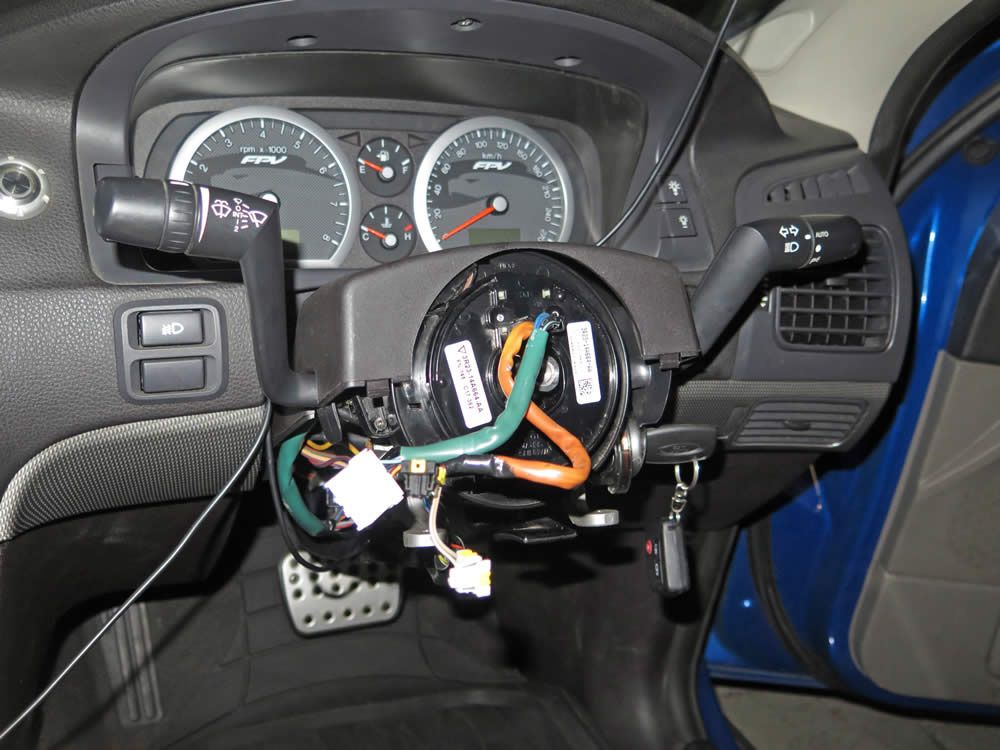 Then I got curious and wanted to check the headlight switch wires. When the headlight switch doesnít work then it is because one or more of these wires has broken. This is what had happened to the original switchgear that was in the ute when I bought it. Although those wires can be easily soldered back together, I had a spare working switchgear at home so put that on. I just didnít notice at the time that my replacement switchgear was missing that plastic ring in the centre. 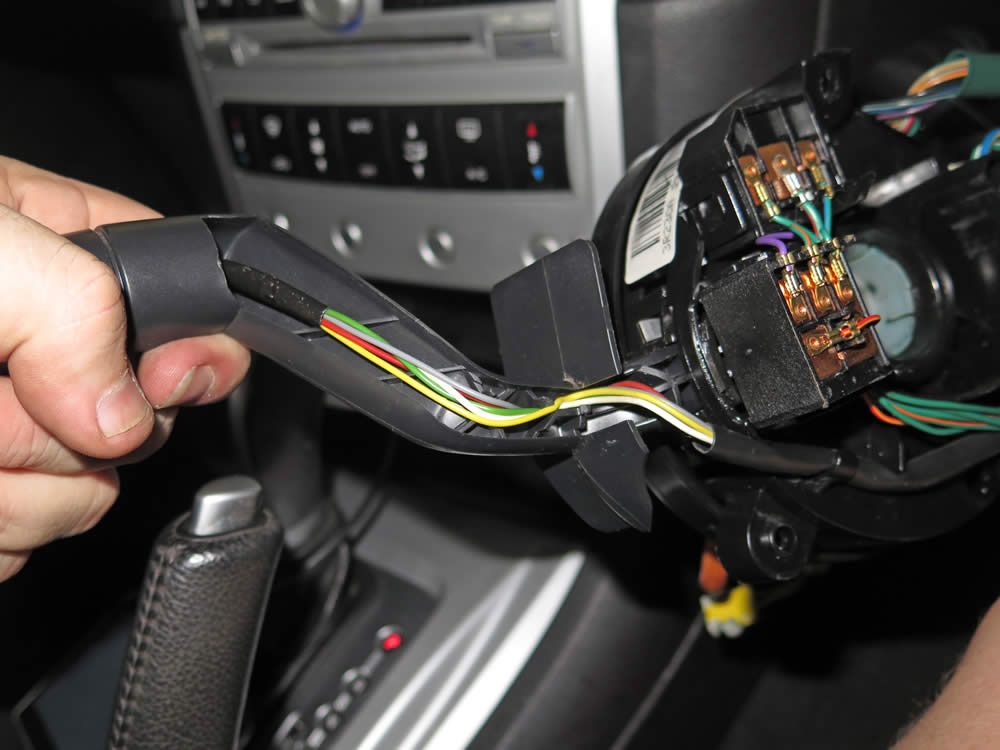 I finally got it all back in one piece and went for a test drive. I was pretty ****ed off when the headlights wouldnít work at all - only the high beam would. It was night, and the ute was also low on petrol, so I made my way to the nearest servo via some backstreets. Then I had to go home, pull it all apart again and try and figure out why the switchgear that has been working for the last few months (except for the self-cancel) was now not working. I had well and truly had enough of all of this by now. Over it. That black plastic box in the centre of the photo is held in place by two small plastic brackets (one on each side). This gadget is the switch for high beam. I clipped it back into place properly and much to my relief all of the lights then worked as they should. 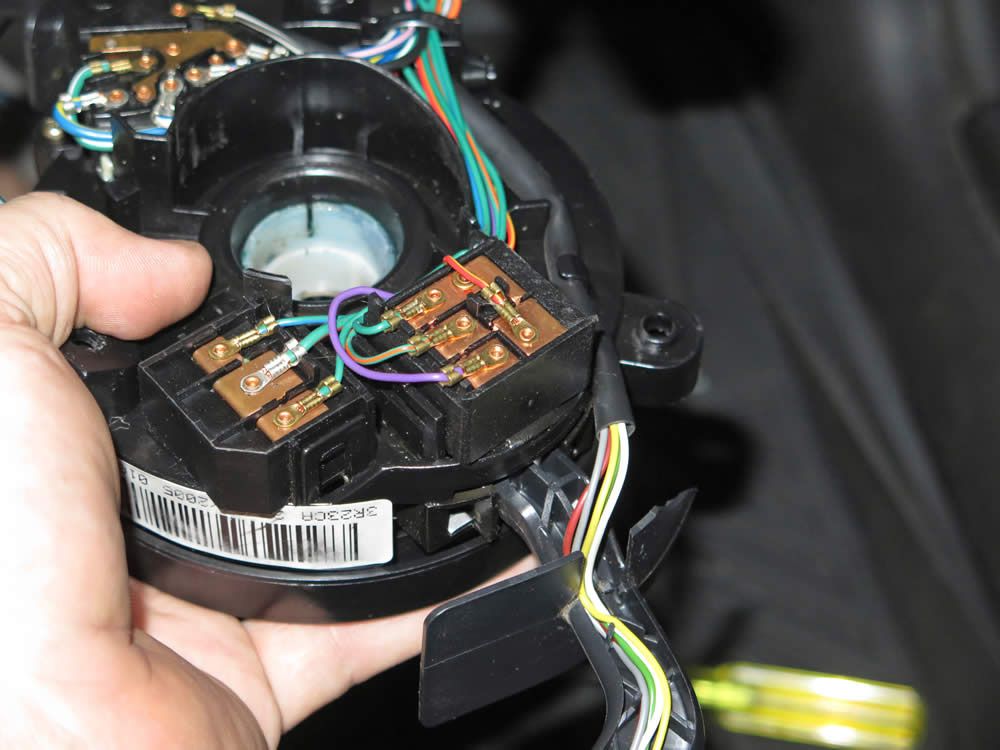 Time to put the steering wheel back on, hopefully for the last time tonight. I did a bunch of testing of indicators and headlights before doing this. 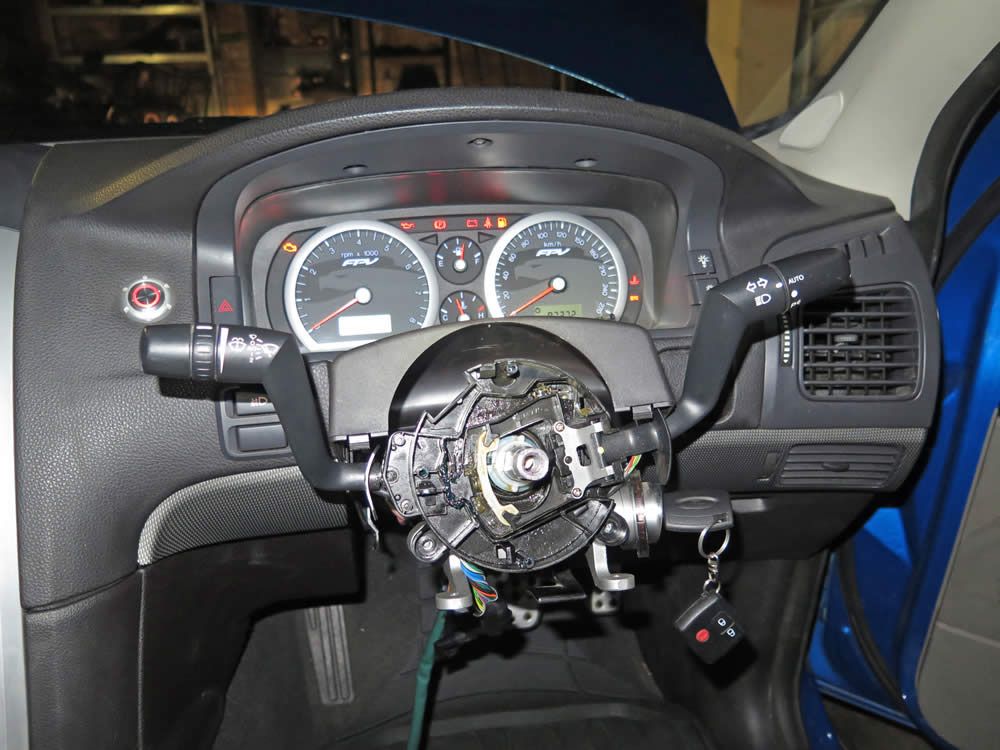 I had removed the steering wheel a couple of days ago to have a look to see if there was something obvious that was out of place. I put the bolt back on with my Ryobi battery-powered impact gun, which I thought had tightened up the bolt enough. However, within a short distance there was slight movement between the steering wheel and steering wheel column (ie the bolt had come loose). I didnít expect this, and wanted to make sure that it wouldnít happen again, so put a drop of Loctite 222 on the bolt. 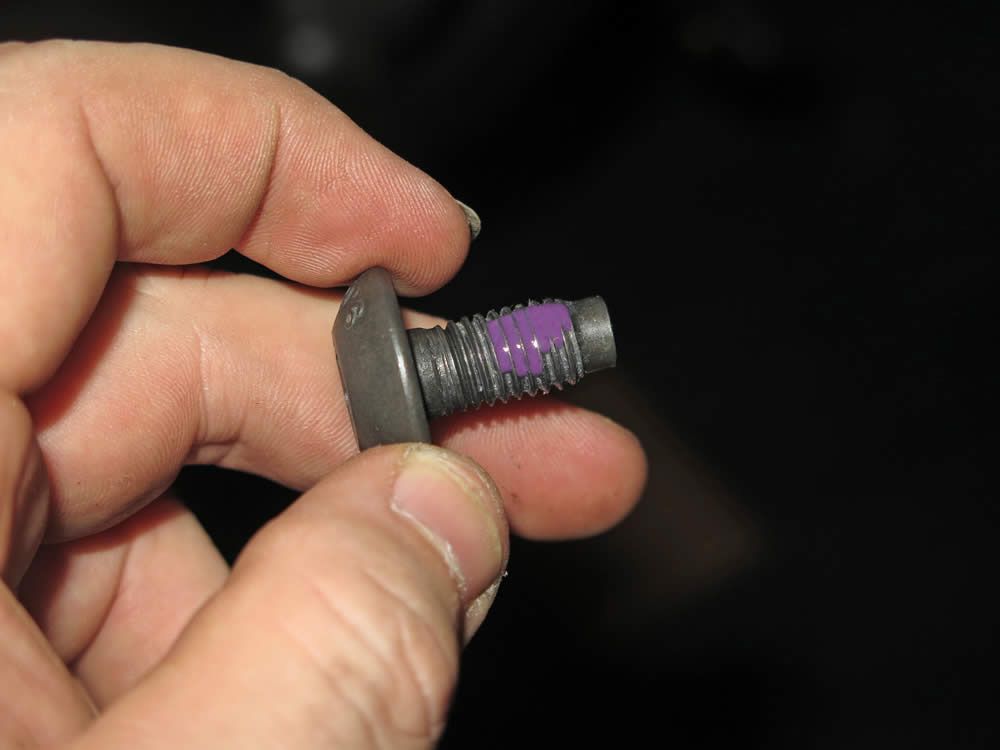 To further make sure that I put the bolt back in place securely, I looked up the torque setting in the service manual. I then used a digital torque wrench to tighten the bolt to the specified 38Nm. 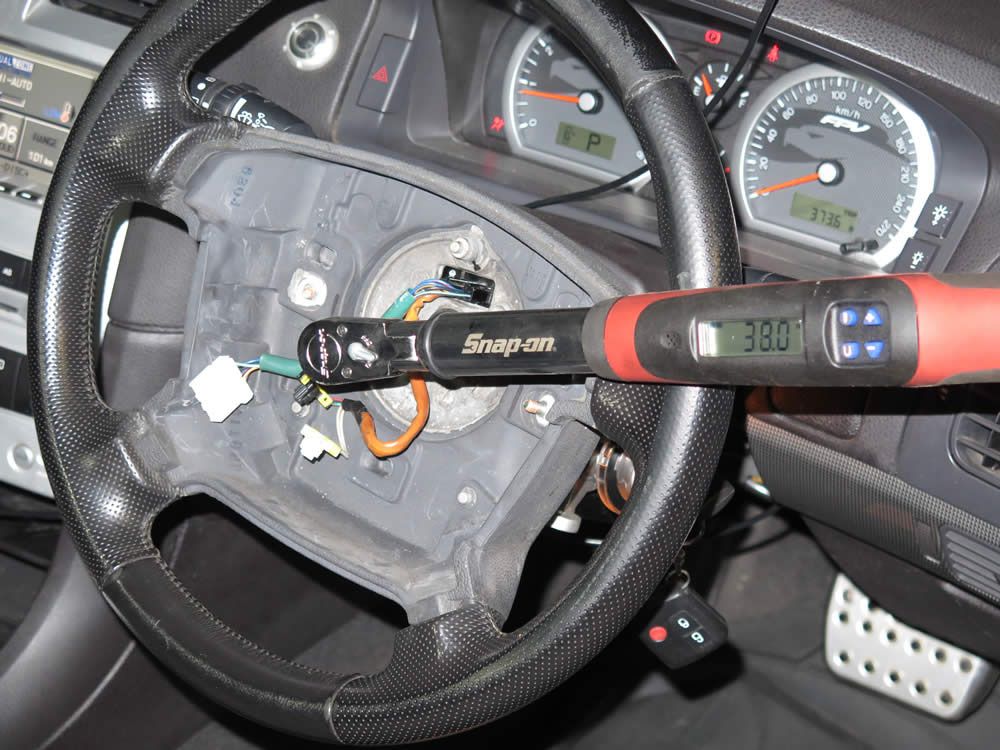
__________________
Click here for my previous Photo Essays and Build Threads.
------------------------------- Good people. Bad people. Smart people. Dumb people. Car crashes. Vomit. Read about it all at Cabloid, the web site that has stories and photos about my life driving a taxi at night. www.cabloid.com.au |
|||
|
|

|
| 3 users like this post: |